Use HaProxy for load balancing multiple endpoints Socket.IO

Recently, i’m very busy because i have some projects and problems need to resolve, one of my problems is how to improve availability of system ?. I began to find solutions for this problem and i focus on “Load balancing” for system with HaProxy, Redis with Socket.IO to build load balancer system. As you know HaProxy is very fast and reliable solution offering high availabilityload balancing, and proxying for TCP and HTTP-based applications. Some test cases about performance of HaProxy, it so great and it can achieve more 2 million concurrent connections (base on TCP connection). HaProxy appears in many big systems as game-online or banking system that supports load balancing for millions of users and real-time connections. Today i will guide how to install, setup and deploy HaProxy to “load balancing” for multiple nodes run as “server socket.io”. Here i will make a small demo with nodejs-server and socket.io-client.

I will test follow the below model

architech-testI have four servers with

Test1 : 4 core, 16GB Ram
Test2 : 4 core, 16GB Ram
Test3 : 6 core, 32GB Ram
Test4 : 4 core, 16 GB Ram

Ok, let go to build simple example to test HaProxy

Step 1 : Install HaProxy on Test4 server

* yum install haproxy

Step 2 : Open configuration file “/etc/haproxy/haproxy.cfg” and add the below content

frontend http-in
   bind *:9199
   default_backend socketio-nodes
   stats enable
   stats uri /?stats
   stats auth admin:admin

backend socketio-nodes
   option forwardfor
   option http-server-close
   option forceclose
   no option httpclose

   balance url_param session_id check_post 64
   cookie SID insert indirect nocache
   server node1 test1.azstack.com:9100 weight 1 maxconn 1024 check cookie node1
   server node2 test2.azstack.com:9100 weight 1 maxconn 2048 check cookie node2
   server node3 test3.azstack.com:9100 weight 2 maxconn 4096 check cookie node3

You need to note a few configuration:

balance url_param session_id check_post 64 is selection criteria for load distribution.
weight 1 : weight of very nodes.
maxconn 1024 : max concurrent connect on the node.

Step 3 : Start HaProxy 

* /usr/sbin/haproxy -f /etc/haproxy/haproxy.cfg 

Endpoint of HaProxy : test4.azstack.com:9199

Step 4 : Create simple socket.io server and listen on port 9100 

https://github.com/kimxuyenthien/socketio-demo/blob/master/server

duplicate socket.io server instance for the other two nodes and run it

start_socketio_server

* node socketio-server.js 

Step 5 : Create simple websocket client to connect. 

https://github.com/kimxuyenthien/socketio-demo/tree/master/client

Step 6 : Try to connect to HaProxy (Invite your friends join to test)

HaProxy endpoint (test4.azstack.com:9199)

client-connect

Step 7 : Check log on socket.io server

my connection

have_new_connection_node2

and more connection from my friend

have_new_connection_note3have_new_connection_node1

Ok, you can see ip client allway is 128.199.123.119, that great because all packet is forwarded by HaProxy.

Some advance topics for you

  • How to setup SSL for HaProxy.
  • How to use Redis to run cluster socket.io server.

Maybe i can write above problem, thank for reading. Have a nice day.

Zookeeper multiple-nodes cluster setup

In the previous post, i was overview about Zookeeper and explained how to it work (post). Zookeeper is core system, it provide an API to manage the status of application nodes in distributed environment,  Zookeeper is very important component so what happens when a server Zookeeper is died ? Maybe the whole system will stop working and this is serious. To resolve this problem then Zookeeper support it can be run as cluster go when leader node die all of the nodes will run “Algorithm election” and a new node will became leader. So Zookeeper cluster is high availability, and below i will present details how to setup Zookeeper on multiple-nodes.

Pre-requisites : you have some servers to setup, with me i have 4 server need to setup Zookeeper cluster

Node1 : 10.3.0.100
Node2 : 10.3.0.101
Node3 : 10.3.0.102
Node4 : 10.3.0.103

Step 1 : Add information servers to DNS hostname configuration

vi /etc/hosts

10.3.0.100 cloud1
10.3.0.101 cloud2
10.3.0.102 cloud3
10.3.0.103 cloud4

Step 2 : You need download Zookeeper stable version from page (Zookeeper homepage) and save into node1

wget http://mirror.downloadvn.com/apache/zookeeper/stable/zookeeper-3.4.10.tar.gz
tar -xvf zookeeper-3.4.10.tar.gz

Step 3 : Create path folder to store Zookeeper data (all nodes).

mkdir /data/hdfs/zookeeper

Step 4 : Setup memory use to run Zookeeper instance, create java.env to add the below configuration

vi $ZOOKEEPER_HOME/conf/java.env

Add this below content to file

export JAVA_OPTS="-Xms4096m -Xmx4096m"

(i was changed memory to run Zookeeper instance to 4GB)

Step 5 : Config zookeeper

cp zoo_sample.cfg zoo.cfg
vi zoo.cfg

add this below configuration to file

tickTime=2000
initLimit=10
syncLimit=5
dataDir=/data/hdfs/zookeeper
clientPort=2181
maxClientCnxns=2000
server.1=cloud1:2888:3888
server.2=cloud2:2888:3888
server.3=cloud3:2888:3888
server.4=cloud4:2888:3888

Explain some parameters is used

maxClientCnxns : max clients number connection to node.
clientPort : current node listen on port 2181
dataDir : path to store data.
3888 : port listen connect from other nodes in cluster.
2888 : port listen if that is leader node.

Step 6 : Copy zookeeper folder to all of them

rsync -avz zookeeper-3.4.10/ cloud2:/data/zookeeper-3.4.10/
rsync -avz zookeeper-3.4.10/ cloud3:/data/zookeeper-3.4.10/
rsync -avz zookeeper-3.4.10/ cloud4:/data/zookeeper-3.4.10/

Step 7 : Config ID of node to run cluster

on cloud1

echo "1" >> /data/hdfs/zookeeper/myid

on cloud2

echo "2" >> /data/hdfs/zookeeper/myid

on cloud3

echo "3" >> /data/hdfs/zookeeper/myid

on cloud4

echo "4" >> /data/hdfs/zookeeper/myid

Step 8 : Start all instance with command

./bin/zkServer.sh start

Run command jps to check

Done, If you have any question about setup Zookeeper cluster please contact me (facebook or linked) we can discuss about it. Thank for reading.


Zookeeper coordination service for distributed system :)

Zookeeper open source very powerful for distributed applications. It is used very popular in Hadoop ecosystem and the fist i knew it is when i build cloud message for AZStack-SDK, we use Hbase + Hadoop + Zookeeper  build cluster to store message and query over hundred GB data. Hadoop and Hbase are distributed application, with Hadoop  (multiple namenode, datanode) and Hbase (regionserver). Zookeeper is really excellent coordinator. After use Zoo for cloud message, i started to learn more about it so it really cool for me. In fact, the way information in zookeeper is organized is quite similar to a file system. At the top there is  a root simply referred to as /, below root are znodes.

zknamespace

Unlike an ordinary distributed file system. Zookeeper supports the concepts of ephemeral zNode and sequential zNode. An ephemeral zNode is a node that will disappear when the session of its owner ends. In distributed application every server cam be defined public ip in an ephemeral node, when server loose connectivity with Zookeeper and fail to reconnect within session timeout then all information about that server is deleted. The below figure is a illustration  how to use ephemeral node for manage distributed services


zookeeper_ephemeral


Sequential nodes are nodes whose names are automatically assigned a sequence number suffix. This suffix is auto increment and assigned by Zookeeper when the zNode is created. An easy way of doing leader election with Zookeeper is to let every server publish it information in a zNode that is both sequential and ephemeral. Then whichever server has the lowest sequential zNode is the leader. If the leader or any other server goes offline, its session dies and its ephemeral node is removed, and all other servers can observe who is the new leader.

How to Zookeeper cluster work with client ?

Zookeeper cluster have 2 types (Leader, Follower) system run load balance when client connect to cluster, every instance zookeeper can be served many clients. If client request read data to Follower instance then it response direct by local data, however when client request write data this request will be forwarded to leader and leader broadcast into all node  to update data on follower instance.


fig01

The main objective of the post is introduce the overview about Zookeeper. The next post i will give you instructions how to install, config and how to use Zookeeper in distributed application. Thank you for reading.


Kamailio add user and test with softphone (Linphone, Zoiper)

In the previous post, i guided how to build and config Kamailio with MySQL as database engine to work, if you have not read it yet then read at post. Today i will guide how to create user and demo basic VoIP system with softphone. Linphone and Zoiper are used to test, these are popular opensource softphone nowadays, support multiple platform (Desktop, Android and IOS).

Dowload Linphone : http://www.linphone.org
Download Zoiper : https://www.zoiper.com

According to the previous post, i have Kamailio is installed with path “/data/kamailio”. The first i need to create some account to register Kamailio server.

To add new user please remote to server and run command

/data/kamailio/sbin/kamctl add

example

/data/kamailio/sbin/kamctl add 01632796542 hieu1234
/data/kamailio/sbin/kamctl add 01643934930 abc123

After add users, you should check records in database. All users information are stored in table “kamalio.subcriber”. The image below is result

Selection_031

Start Kamailio server to test

/data/kamailio/sbin/kamctl start

The next step i install Linphone on my desktop and zoiper on my phone (Android). Register account 01632796542/hieu1234 by Linphone

Selection_033

Register 01643934930/abc123 on Zoiper and make call to account 01632796542

22833444_1299800916798771_308804700_o          22810395_1299801823465347_913952245_o

When make call to 01632796542, on my desktop get a notification “incoming call” as below

Selectio


Ok i introduced you how to build and setup a basic VoIP system, how to manage account and test call with softphone. Thank you and see you next time.

Build and config Kamailio 5.0.3 integrate MySQL database

I usually work with VoIP system and integrate it with SDK support communication platform.  Kamailio is very powerful asynchronous TCP, UDP and SCTP secure communication via TLS, support some advance features load balancing, routing fail-over, accouting, authentication and authorization. Kamailio is one of the best performance flatform VoIP, so i choose Kamailio to build VoIP system and integrate with our AZStack SDK.

Some main features is supported by Kamailio

  • Registrar server
  • Location server
  • Proxy server
  • SIP application server
  • Redirect server

Do not support by Kamailio

  • Sip phone.
  • Media server

I will have some chapters about Kamailio as build, config,  run and demo with SIP client (softphone). In the post, i focus guide step by step to build Kamailio from source and deploy over network. Ok let begin

Step 1 : You have to install mysql on server, you can reference how to install MySQl the latest version at post 

Step 2 : Install prerequisite tool

apt-get install flex gcc bison libmysqlclient-dev make libssl-dev libcurl4-openssl-dev libxml2-dev libpcre3-dev

Step 3 : Download and extract Kamailio the latest version

wget https://www.kamailio.org/pub/kamailio/latest/src/kamailio-5.0.3_src.tar.gz
tar -xvf kamailio-5.0.3_src.tar.gz

Step 4 : Build  source

mkdir /data/kamailio
make prefix=/data/kamailio/ include_modules="db_mysql dialplan" cfg
make all
make install

Step 5 : Setup database connection to MySQL

vi /data/kamailio/etc/kamctlrc

Edit some of configurations as follows

## your SIP domain
SIP_DOMAIN=docker.azstack.com

## database type: MYSQL, PGSQL, ORACLE, DB_BERKELEY, DBTEXT, or SQLITE
DBENGINE=MYSQL

## database host
DBHOST=localhost

## database host
DBPORT=3306

## database name (for ORACLE this is TNS name)
DBNAME=kamailio

# database path used by dbtext, db_berkeley or sqlite
# DB_PATH="/usr/local/etc/kamailio/dbtext"

## database read/write user
DBRWUSER="kamailio"

## password for database read/write user
DBRWPW="kamailiorw"

## database read only user
DBROUSER="kamailioro"

## password for database read only user
DBROPW="kamailioro"

Step 6 : Setup alias and port for run service

vi /data/kamailio/etc/kamailio/kamailio.cfg

edit content

alias="docker.azstack.com"
port=5060

Step 7 : Init setup database

/data/kamailio/sbin/kamdbctl create

Please enter your password to authentication MySQL server, Kamailio will auto create database to work. If you have some errors please check status MySQL database.

Step 8 : Start Kamailio and check result

/data/kamailio/sbin/kamctl start

start

check server be listening on port 5060

netstat -apn | grep 5060

listen

It ok! in the next post i will guide how to create user and use SIP-Phone connect Kamailio to Call and message. See you next time!

SIP – Session Initiation Protocol Overview

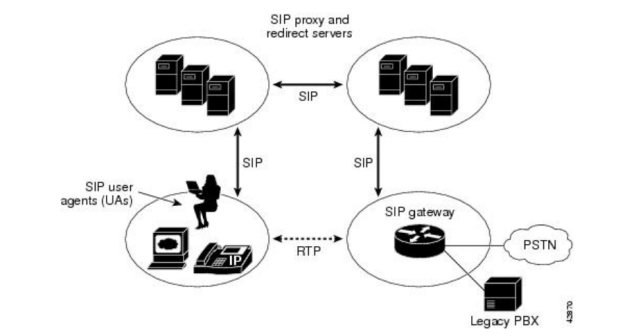
Session Initiation Protocol is an ASCII-base, application-layer control protocol that can be used to establish, maintain and terminate calls between two or more endpoints (Wiki..). Ok let go with simple things about SIP, it is protocol enable supported voice and multimedia calls over IP networks and you can communication between  hard-phone (GSM, CDMA)  and soft-phone or browser. You can make calls to phone from web, desktop applications or vice versa, support manage calls session provide recording, limit duration call bla bla. It is very effective for your business, customer care or support call-center.

webrtc2sip-click-to-call

Some information about SIP

SIP components : SIP is peer-to-peer protocol. The peers in a session are called user agents (UA). UA can function in one of the following roles

  • User-agent client (UAC) client application that initiates the SIP request.
  • User-egent server (UAS) server application that contacts the user when a SIP request is received and return a response on behalf of the user.

Selection_024

SIP clients : Sip client to send SIP request and receive SIP response

  • Softphones : Cisco SIP IP phones can initiate SIP request and response.
  • EPhones :  IP phones that are not configured on the gateway.
  • Gateways : Provide call control, it provider many services. The most common being a translation function between SIP endpoints.

SIP Servers

  • Proxy server : receives SIP request from a SIP client and forward them on the client’s behalf. Basically, proxy servers receive SIP messages and forward them to the next SIP server in the network. Proxy server can provide functions authentication, authorization, network access control, routing, reliable request retransmission and security.
  • Redirect server : Providers the client with information about the next hop or hops that a message should take and then the client contacts the next-hop server.
  • Registrar server : Processes requests from UAC for registration of the their current location.
  • Location server : a server which record and maintain contact information of it and every UA with in a typical enterprise.

location_server

Some products for VoIP system

Client : LinPhone, Zoiper, 3CX.
Open source server : Sems, Kamailio, Janus gateway, Freeswitch, Asterisk.
Service provider : Twillio, VHT.

Ok in the post, i will just guide to you overview information about SIP. In the next posts i will talk how to install an config some open source for product. Please read it.

********** Notice **********

Our product is AZStack SDK is provide functions for VoIP, if you have problems SIP trunk or you are looking for a solution for you business please contact me, we can discuss about it.

Easy to add new disk on Centos, Ubuntu

You have experience working with system database of product, i think you encounter problems with hard driver capacity. The first buy cloud server, i added a disk with 300 GB to run and storage data of MySQL and some data, it ok at that time. After a period of operation then disk available have not enough for run stable. I need to increment available disk for server cloud. Here are the steps i have taken

Step 1 : Go to cloud management and add new disk to instance (500 GB)

disk

Step 2 : Remote to server and show all information partitions on server, run command

sudo fdisk -l

and you can see as shown below

show_all

Step 3 : Setup for new partition, run command

sudo fdisk /dev/sdd

  • Add a new partition – enter (n)
  • To setup new partition as primary type – enter (p)
  • Partition number – enter (1-4) and default is 1
  • First sector – enter default
  • Last sector, +sectors or +size{K,M,G,T,P} – enter default
  • Write table to disk and exist – enter(w)

Re-run command fdisk -l to show result

Selection_success

Step 4 : Format new partition (/dev/sdd1)

sudo mkfs.ext4 /dev/sdd1

Step 5 : Create new path to mount

sudo mkdir /u01

Step 6 : Show UUID information all partitions

sudo blkid

016

Step 7 : Add config new partition as new line to /etc/fstab to auto mount when startup

UUID=dbdc29ac-64cb-4104-b257-707017bdd734   /u01   ext4   defaults   0   0

Step 8 : Commit all config mount in file /etc/fstab, run command

sudo mount -a

Step 9 : Check result

sudo df -l

017

New partition is mounted to path /u01 , ok done!

Create user MySQL and limit permission

Today, we have project with our partner and he want access to our database (MySQL) to show more information about project. What should i do ?
Of course, i can’t send admin account for him because it is very sensitive and maybe it can harm for our system. Ok, I need a new account for our partner and that account just have some permission read on database of this project.

Step 1 : Connect to database with MySQL command
mysql -u root -p

Step 2 : Create account with name (our partner name is peter)
CREATE USER ‘username‘@’host‘ IDENTIFIED BY ‘password‘;

username : specify username for account
password : is new password for peter user
host : IP server user is used to connect to MySQL server

Example : create account peter/Hka389l@
CREATE USER 'peter'@'localhost' IDENTIFIED BY 'Hka389l@';

Step 3 : Grant privileges for account
GRANT privileges PRIVILEGES ON database.* TO ‘username‘@’host‘;

privileges : ALL, SELECT, INSERT, UPDATE, DELETE, CREATE, DROP, INDEX
database : Database is allowed access

Example : Grant all permission on database ‘ikewnit’ for account ‘peter’
GRANT ALL PRIVILEGES ON ikewnit.* TO 'peter'@'localhost';

Step 4 : Flush to update privileges
FLUSH PRIVILEGES;

Step 5 : Try to login (use phpmyamin)
php

Build Hadoop 2.7 from source on Centos step by step

Hadoop is one of the best open source for store and processing big data. It has a lot of supports from community and many big companies have used it for their products. In my company, Hadoop ecosystem have used to store message chat and information log, it is very effective but it required many resources server as ram, cpu and disk. If your product is small system you should consider using it.

Ok let start find answer for question “How to build hadoop from source ?”

Step 1 : The fist you should disable Firewall local
sed -i 's/SELINUX=enforcing/SELINUX=disabled/' /etc/selinux/config

Step 2 : Download JDK and setup environment
wget --no-check-certificate --no-cookies --header "Cookie: oraclelicense=accept-securebackup-cookie" http://download.oracle.com/otn-pub/java/jdk/8u45-b14/jdk-8u45-linux-x64.tar.gz
tar -xzf jdk-8u45-linux-x64.tar.gz -C /opt/

Step 3 : Create user and group “hadoop” as user run service
groupadd hadgroup
useradd haduser -G hadgroup
passwd haduser

Step 4 : Create ssh-key for authentication between servers
ssh-keygen

Step 5 : Install tool development and library
yum groupinstall "Development Tools" "Development Libraries"
yum install openssl-devel cmake

Step 6 : Install maven to build Hadoop (source)
tar -zxf apache-maven-3.3.9-bin.tar.gz -C /opt/

Step 7 : Setup maven environment
export JAVA_HOME=/opt/jdk1.8.0_45
export M3_HOME=/opt/apache-maven-3.3.9
export PATH=/opt/apache-maven-3.3.9/bin:$PATH

Step 8 : Build Protobuf (source)
tar -xzf protobuf-2.5.0.tar.gz -C /root
./configure
make
make install
sudo ldconfig

Step 9 : Download source and build Hadoop (source)
tar -xvf hadoop-2.7.1-src.tar.gz
cd hadoop-2.7.1-src
mvn package -Pdist,native -DskipTests -Dtar -Dmaven.javadoc.skip=true -Dmaven.javadoc.failOnError=false

Step 10 : Move build to new folder
mv hadoop-2.7.0-src/hadoop-dist/target/hadoop-2.7.0 /opt/

Done, and now you have Hadoop was built at path /opt/hadoop-2.7.0
In the next post, i will write how to setup hadoop as cluster. Thank you!

Config nginx as reverse proxy server

Nginx is open source web server is very popular. It is very fast and support many function as load balance, visual server bla bla … you can get more information about it at main page https://nginx.org/en/

Today, I focus

  • How to add new domain to nginx.
  • How to setup nginx as reverse proxy to forward request to internal service.

Suppose you have some resources

  • Cloud server with static IP 67.205.175.55 and default domain is test.azstack.com.
  • You have new domain test-api.azstack.com want to add point to  67.205.175.55.
  • Service API written by nodejs and listening on port 9002.

How to do it ?

Suppose nginx is installed on linux system, the steps to perform the configuration are as follows :

Step 1 : Check file config of nginx

find / -name "nginx.conf"

Step 2 : Edit and add content to nginx.conf

vi /etc/nginx/nginx.conf

Add the below content

Continue reading